
Pablo Picasso
1881-1973

Picasso in his studio...

Genius artist as a boy...

Photo of Picasso at 15 years old...

Picasso Painting at age 14

Picasso Painting at age 56!


PIcasso Rooster 1938

Step by Step Drawing
Used this image for refernce shapes

Image from
My step by Step drawing of the Rooster

Mrs. Johnson's 2nd grade
Practicing the Rooster


Redraw for Final on bigger colored paper

Adding color
Student Work

Mrs. Parker's 2nd grade
Anna Blair, Sophia, Julian & Emily
------


Mrs. Johnson's 2nd grade
Joseph, Allison, Musa,
Reggie, Erin, Ria,
Santiago & Joshua
-----------
Mrs. Craig's 2nd grade
Malachi, Jazayah & Sophia

-------------
Mrs. Russel's 3rd grade
Brianna, Bryan, Kai& Gianna

---------
Mrs. McMillian's 2nd grade

---------
Mrs. White's 2nd grade

Sarah, Melanie, Hailey,
Valerey, Angel & Emma
-------Mrs. Mathai's 3rd grade

Bryce & Tam

Cheylah, Zoey, Austyn & Heila
-------------

Finished with color... but it needs to be kicked up a nothch.

So....

Adding in black crayon outline to any spots that got hidden.
EMPHASIS! Make it stand out, loud & proud.
Can't just do one!


__________________________________________________________________________
Mrs. Celestine's 3rd grade/ Thursday

Hailey, Jasmine, Gabby...
Michael & Makayla
Mrs. May's 3rd grade /Wednesday 


 Lucian & Justice (Reimer's)
Paola & Maisy
Kolby, Kayla & Christian
Gavin & Adalene
Stained Glass alternative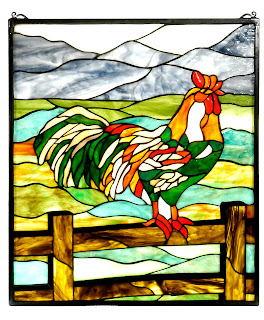


Lightly draw rooster onto paper with pencil.
Outline rooster with Permanant Black Martker.
Divide big epen sections off with boxy shapes. Outline these with permanant marker as well.
Use Crayola markers to outline inside each shape with the color you would want it to be.
Try to use a variety of that type of color to make it more interesting.
For example,
Instead of one blue for the sky, use multiple kinds of blue or even add in another color that is closely related to blue (purple).
Close look at outline...
can add in additional small dots to shapes that are larger.
You will see why later...

using a variety of greens in grass...

WIth a small pointy brush and cup of water, trace the edges of shapes with water and pull ink inward to fill in shape. THis makes it look translucent like glass. THe extra dots of for the larger shapes to get additional ink needed to fill in more solid.
Continue until completed with water.
See the same technique from a differnt assigment here... using washable marker watercolor...
https://www.youtube.com/watch?v=oZHSyRyKlqU&index=19&list=PL4AE49DD6487CE892
VIsual Image Reference to lesson
I am not claiming any below images as LostSock images...
only for purpose of art education.


Stained glass is divided into small shapes or sections and
connected together like a puzzle with black lead.