UNDERSTANDING PERSPECTIVE
Teacher Samples (above)
Student examples January 2023
High School
Middle School
Max Garman, Jasmin Duran,
Michelle Camargo, & Courtney Nguyen
Melanie Camargo 8th grade
Jaedyn Short 8th grade
Kaden, Wesley Fosnight,
Carl Adair, & Aiden Cowart
Ariel Stone, Jazmyn Ortega,
Kaylee Reed, Selena Martinez,
Eduardo M., Paislee Hall,
Wyatt Salonen, Cadance Barrera
Jarezi & Kalie
Kinslee Harle & Madison Mendez
Layel Rodgers
Vocabulary:
Eye Level- Your personal perspective of what you see at one time.
Usually….
Anything above your e.l., you see the bottom.
Anything below your e.l., you see the top.
Anything to the Right, you see the left side.
Anything to the Left, You see the right side.
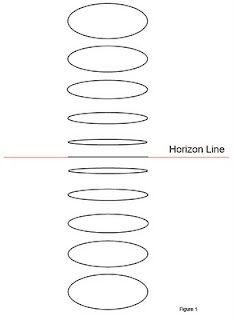
Horizon Line- Where the ground meets the sky, floor meets the wall, H.L. is at your eye level.
Contour Line- when lines bend on a form to conform to the outer edge.
Vanishing Point- The point where lines vanish at your eye level or horizon line.
Foreshortening- When something seems bigger, smaller, shorter, or taller because of your perspective.
Joshua Nava
https://www.joshuanava.biz/realistic/define-realistic-drawing.html
1. PIPES UP, PIPES DOWN
Foreshortening:
Draw ovals above and below eye level.
The ovals closer to the eye level should be shorter.
Draw lines from corners of ovals going away from eye level.
Challenge: Add creativity, shading, background.
2. STALACTITES AND STALAGMITES
Stalactites are natural cave formations
ABOVE your eye level and
Stalagmites are BELOW your eye level.
Martin Hargreaves, Illustrator
Make eye level at center of box.
Make bumpy triangles going upward and downward.
Keep top ones above eye level
And bottom ones below eye level.
Use overlapping, getting smaller
as you go back into space of cave.
Use contour lines
Bend lines upward above eye level
And downward below eye level.
3. POPPING PUZZLE PIECES
These will focus on contour line and eye level.
Draw deep curvy lines going longer horizontally.
Draw free from blobs longer horizontally.
Starting with lowest areas first,
Draw lines going downward from the furthest point of each curve.
Go upward to next curves.
Use lines the follow the contour of where they came from. More in depth instructions here from
MakeAMarkStudios…
4. OP ART TUNNELS
These will focus on a Vanishing Point in the very center.
Each box will be different because of your eye level.
Fold paper into 3 by 3.
Draw boxes inside fold lines.
These fold lines are your “frames” of your tunnels.
Make a dot in the middle of the middle box.
This dot is your vanishing point & eye level.
Connect each corner of the box that does not cut through the frames. You cannot draw in the frames, only in the tunnels.
Have a constant light source. Mine is at top center.
2 opposing sides should be shaded medium.
One side should be dark and opposing side light.
As the tunnel goes back towards the vanishing point, it should also get darker.
Click Art above to get more in depth with project
Source Unknown
Showing Boxes rather than tunnels.
ESSENTIAL QUESTION:
Using the clues from above on Eye Level, Foreshortened Circles, and Contour Line,
Are these Japanese Lanterns at, below, or above your eye level?


